Showing posts with label DIY. Show all posts

19 January 2017

Painting wooden furniture in your home is easier than you think


Over time, the paint on your wooden furniture tends to fade, and you end up with a worn out and old look that is desperate for a touch-up. What’s great about solid wood furniture is that the structure keeps intact, and you can easily repaint these types of furniture. With the right tool you can make the furniture look brand new again, and it’s super easy to do it all by yourself if you just follow a few simple steps.

In order to freshen up your wooden home furniture you will need paint, paint primer, wood filler, a putty knife, sand paper, foam roller, a good brush, gloves, a face mask and sealant. 


Preparations

Make sure that you’re in a well-ventilated area when working with smelly paint. Place the piece of furniture on a plastic sheet to avoid unfortunate spillage. Start by cleaning the furniture and then fill scratched or uneven areas with wood filler. Wipe off the excess wood filler after applying it, let dry, and sandpaper until even once it has dried. This will give you a nice and smooth foundation for your furniture paint.

Applying paint primer

Using a paint primer is important in order to get the paint stick and keep better. By not using a primer you risk the paint peeling off, and that longed for long-lasting effect is long gone!
Use a paint brush to apply the primer to the edges and corners, and a roller for the main surface. There’s no need to worry too much  about an even application as you can use sand paper to clean off the excessive sawdust. 


Painting your wooden furniture

Your piece of furniture is now ready for the most fun step, which is to apply the paint. Just as with the primer, use a foam roller for surfaces that are flat and paint brushes for areas that are uneven or where the rollers cannot reach. Use the paint sparingly, and paint two thin coats rather than one thick in order to avoid the paint dripping and creating unwanted patterns.

Finishing off with sealant

If you want to obtain a look that is really shiny, consider using paint sealant. This is the final stage of your painting project, and it means that the furniture will be protected from wear and tear, as well as getting a glossy look. Just make sure that the sealant is completely dry before you move the piece of furniture to its right place to avoid unwanted marks or prints.


2 September 2016

The houseplant that tugs on your heart strings

Did you know that there is a houseplant that tugs on your heart strings?
According to thejoyofplants.co.uk, the houseplant of the month for September is hanging plants, and one of them is Ceropegia Woodii which also goes under the nickname of String of Hearts - very suitable thinking about the appearance of it.
The simple but beautiful heart shaped leaves are intertwined with each other, and each vine can grow really long - perfect for covering a bookcase or placing on a floating shelf on the wall where the plant can hang freely and drape your room in a stunning way.

The plant is one that I always used to see at my parents' house, and therefore it makes me think of my mum and her love for plants and home decoration. It's quite lovely when you think about it really... that this heart shaped plant makes me think of loved ones. It's like it brings family together, and it symbolises it with its hundreds of hearts tied together with string. 

I didn't just want to place this plant on its own in my window and just let it sit there... I wanted to let it symbolise the fact that love is the key to everything, as well as the feelings I have for near and dear ones. Since I'm living in a different country to my family it's important for me to have them around in other ways, and I collect photos, cards and other memorabilia that remind me of them. Therefore, I decided to style up this plant of the month in the loveliest way I could think of; tying together friends and family, and memories of love. 

Love is happy summer memories with friends, and being asked by a dear friend to be a bridesmaid at her wedding.

Love is cherishing your childhood friend's big wedding day, and seeing her genuinely happy face every day.

 Love is a beautiful handwritten letter from your soulmate.

 Love is sisters. The best friend and the closest person you will ever have in your life. The one you shared everything with whilst growing up, and the only one who knows all your secrets.

 Love is a piece of memorabilia that reminds you of a very special occasion.

Love is the announcement of a new family member, and a birthday card that has been carefully chosen based on your personality.

 Love is a good luck wish for a new job.

 Love is a wedding invitation, and a box full of happy memories.

Ceropegia Woodii, or String or Hearts, is native to the southern countries of Africa, but was actually named by a Swede when it was discovered. No one else than Carl Linnaeus to be precise. Back in school in Sweden we had to study his world of flowers when we were very young, and it's something I'll always remember.


Apart from reminding me of loved ones, what I really like about this hanging plant is its bizarre shape. I've never seen another plant quite like it. The colour and patterns of the leaves are quite mysterious looking, and the shape almost looks alien!
But the best thing about it is that it's a plant that is hard to kill - even for someone like me who have a tendency to forget to water plants for weeks!

I hope that you got inspired by my little DIY project, and that it tugged on your heart strings a little bit.
I would love to know how you tend to decorate with plants, and especially hanging plants, which just happens to be the houseplant of the month.

7 May 2016

DIY hen party invitation for the bride

hen party invitation for the bride
If you, like me, have been spending the last couple of months planning a hen party, and it's time to send a save the date invitation to the lucky bride-to-be, why not make her something special.
After all, it's a once in a lifetime event (hopefully) and it's something lovely to remember the day by.

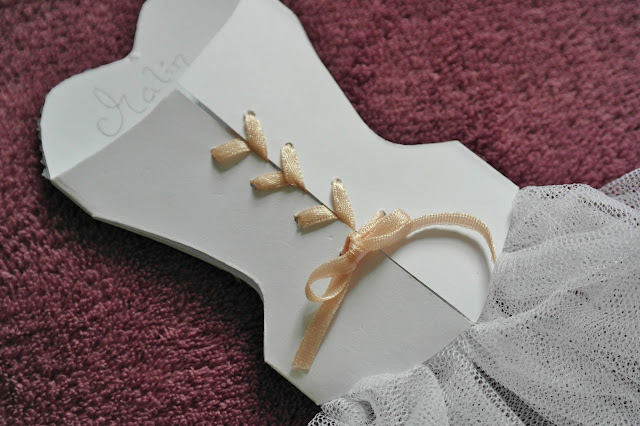
Having browsed Pinterest for inspiration on DIY hen party invitation cards, I found a gorgeous one that looked like a corset, and decided to make my own version of it - wedding dress style.

DIY hen party invitation
 I started by folding a card into one that would open as a double, then cut out the sides to create the waist, as well as the top to create a heart shaped bust. Make sure the folds of the card are still intact at the hips and the ribs to make it work.

I then decorated it with with pressed patterned paper, mini pearls (with flat backs to make them stick to the paper), as well as a coloured ribbon as a waistband.

corset card invitation
As for the back, I wanted it to resemble a corset, and therefore made 4 holes on each side in which I added a very thin piece of ribbon and criss crossed it, finishing with a simple bow.
Just don't forget to add your message inside the card before you close it up!

wedding dress hen party invitation
 The last step of the DIY hen party invitation was to add the skirt to really make it look like a wedding dress. I put a few stitches in a piece of tulle to make it scrunch up and fall the right way, and then simply glued it to the inside of the card.

champagne bow
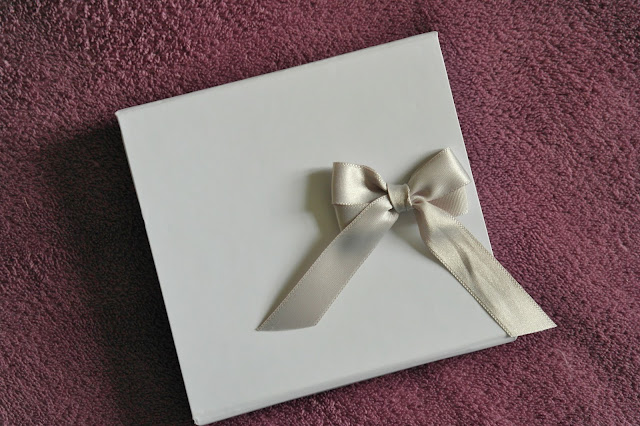
As for the presentation, I decorated a small white box with a champagne coloured bow, and carefully laid the wedding dress card inside.

And that's it, folks. It was a bit tricky at points (threading the corset ribbon!) but the end result really makes it worth it.
Now I just can't wait to see the bride-to-be's face when she opens it!

DIY hen party

4 October 2015

A crafty afternoon with Hillary's

It's been a while (to say the least) since I last used a needle and thread, or did any sort of crafting at all for that matter. So when Hillary's Blinds invited me for a "crafternoon" one recent Sunday I was too curious to say no.

There were quite a few local bloggers invited, and the event was hosed in collaboration with blogger The Crafty Hen, who helped us figure out which was was up and down, and where to add the glue. She was absolutely brilliant!

The first crafty project was to create a sectioned off jewellery box. Sounds easy, but it was actually a bit tricky (especially since I had just cut my nails short and couldn't grab the double-sided tape properly!). The material that decorated the lid was fabric from Hillary's Blind's latest collection, and I opted for a creamy fabric with a soft print of tree branches with flowers.

I thought there was a hint of turquoise in the fabric as well, and in order to bring this out I decided to decorate the box with a turquoise silk ribbon. The big wooden button is a great little extra accessory that goes well with the overall look of the box, especially since there is a tree branch pattern in the fabric.

I added the same fabric to the inside of the box as well, and created two different sections for my jewellery with the help of a piece of cardboard. And this is the final result!
I'm quite happy with it actually, and would proudly keep this on display in my dressing room.

The next project was to create some sort of hair accessory, which was a bit of a challenge as this involved sewing rather than just taping! These were some examples made by The Crafty Hen.

 I opted to try to create a fascinator, and went for the same fabric as my jewellery box, as well as some grey netting fabric which would work as a sort of birdcage style veil. 
The result?

After some swearing and a lot of glue, I finally got my piece together! 
Again, to bring the turquoise out in the fabric I chose a few decorations in the same colour - in this case a few matching buttons and a silk ribbon.
What do you think?

Thanks a bunch to Hillary's Blinds for inviting me to this fun afternoon of crafting!

25 May 2015

7 ideas to spice up your basic display cabinet

I've found a little corner of my house where I could, in theory, fit a display cabinet... 
I just need to convince my other half first! 
I've longed for one for years as I've got a really beautiful collection of designer glass from Kosta Boda, and at the moment I've got nowhere to display these pieces, which means they're just spread out all over the house in really random places. 

I'm quite up for a little DIY challenge though rather than going for a basic look, but that doesn't mean I can't buy a basic display cabinet to start with! I've got so many upcycling ideas! And even though they all won't go in my house, I thought they'd be useful for anyone who owns a basic display cabinet. 
The one above is made of pine and is from furnitureplus - a perfect blank canvas if you ask me! ;)

So, without further ado, below are 7 ideas to spice up your basic display cabinet.

Paint it in your favourite colour
This will really give new life, and a completely new look to your display cabinet. 
If you've got a specific colour theme in the room it will really lift it by painting your cabinet in a matching colour.

Spice it up with wallpaper
An old trick, but one that really works! 
You don't even have to paint the display cabinet, but simply add pieces of patterned wallpaper to the inside bit for an instant beauty boost!

Decorate it like there's no tomorrow!
Paint, fairylights and bunting... why not? 
The kids will love it, and it could be a great project to do together as a family.

Swirl it up!
Add a swirly wooden bit at the top of your display cabinet to create an antique look. 
You can even swap the drawer knobs for vintage options. 

Make it kid friendly
If your display cabinet is going in a kid's room, why not make it into the most awesome dollhouse in the world!?
You'll be the most popular parent in the neighbourhood, for sure!

Go back to basics
So you've got this basic display cabinet and you don't really know what to do with it?
You don't have to fill it with fancy arty pieces worthy of being sidplayed! 
Move it into the kitchen and use it for your standard plates and glasses. 
Basics for basics, but it'll still spice up your view on it.

Match it!
Sometimes it's not about how the actual display cabinet looks, but about what you put in it!
Go all matchy-matchy with a colour theme on your displayed items.

20 May 2015

The dream of recycling an antique sewing machine base

I recently came across a very inspiring article on creative ways of recycling an antique sewing machine base, and ever since I’ve been obsessed with the thought of investing in one of these and making it into a vanity table – similar to the one in the above picture.
I already have an antique Singer sewing machine with the typical swirly iron base back home at my parents’ house in Sweden, but it’s a bit tricky to get it shipped over to England. Plus, the one I already have is really valuable to me with it having once belonged to my great grandmother, so I think I’ll just get my hands on a random one locally that I can experiment with and place in my dressing room.

My ideal dressing room would have lots of teal decorations as this gives a bit of a bohemian or almost oriental vibe. I’ve got a few decorations of this colour already, but would really like to go all out teal, mixed with shabby white and metal.
The focal point of the room would obviously be the upcycled sewing machine vanity table, but the rest of the room would all match, including bedding, lanterns, organiser jars (great for makeup brushes), etc. 

My dressing room isn’t actually a dressing room, but it’s simply the spare room in the house which is for guests. Therefore, it’s tiny and most of the space is taken up by a double bed. Very annoying!
My dream would be to have a single trundle bed in the guest room/dressing room. One that won’t take up much space, that has a pretty frame that matches the style of the room, that you can make up as a sofa during the day with the help of cushions, and that you can easily fold out into a double bed if needed. Something in line with the above trundle bed from Bedz ‘R’ Us would be absolutely ideal!

Just imagine this! Although, with some teal details thrown in the mix. I’d be in heaven!
I definitely need to get myself on Gumtree or Ebay soon to find an antique sewing machine base – I can’t wait to start my next project!
(I just need to convince the man in the house first… or do I?!)
Related Posts Plugin for WordPress, Blogger...